For common, digital are contain only '0' and '1' digit. In digital world, all the value or data are represented in a string of binary number.
So , lets come back. In micronctroller, I use PIC16F877a as an example ( because it was easy for beginner).
That are some common thing you need to know before play(?) with microntroller :
1st : maximun volagte or current supply of the microcontroller *
2nd : the clock fequency (Fosc) of the microntroller *
3rd : the maximum voltage and current sink or source of the microcontroller. *
4th : depend on your application and see datasheet depend what you want to know
For 1 and 3, you can refer to this: (page of 175 in datasheet )
1 :
3:

For more info, you can read DC Characteristics in page of 177.
For 2: (why I use 20MHz?)
You can refer to page 176
Ok , from here , you should have a datasheet on your

There are common pin we need to connect : Vdd (+5V) and Vss ( GND ), OSC1 and OSC2, Vpp, PGD, and PGC.
For PGD and PGC , normally is connect to the programmer. In normal application, we are not use it.
For VDD and Vss, also connect to programmer. This 2 pins must connect to power up microcontroller
For Vpp, if you read datasheet, this pin is active low. Means this pin will will active when it receive '0'. When this pin active, the program in the PIC will restart.
For OSC1 and OSC2, this 2 pin is connect to crystal (XTAL) and parallel with 2 capacitors.
This is the common connection

Lets connect like this:

I will skip the setup MPLABX and its setting. << you are refer to youtube
In PIC microcontroller, major step are same. What same ? Lets find out it.
The step is setting of the PIC.
This tutorial is for MPLABX :
This is a sample code :
#include <xc.h> // library
#define _XTAL_FREQ 20000000
// CONFIG
#pragma config FOSC = HS // Oscillator Selection bits (HS oscillator)
#pragma config WDTE = OFF // Watchdog Timer Enable bit (WDT disabled)
#pragma config PWRTE = ON // Power-up Timer Enable bit (PWRT enabled)
#pragma config BOREN = OFF // Brown-out Reset Enable bit (BOR disabled)
#pragma config LVP = OFF // Low-Voltage (Single-Supply) In-Circuit Serial Programming Enable bit (RB3 is digital I/O, HV on MCLR must be used for programming)
#pragma config CPD = OFF // Data EEPROM Memory Code Protection bit (Data EEPROM code protection off)
#pragma config WRT = OFF // Flash Program Memory Write Enable bits (Write protection off; all program memory may be written to by EECON control)
#pragma config CP = OFF // Flash Program Memory Code Protection bit (Code protection off)
void main()
{
TRISD = 0;
RD1 = 1;
while (1);
}
//end
In the code :
void main()
{
TRISD = 0;
RD1 = 1;
while (1);
}
{
TRISD = 0;
RD1 = 1;
while (1);
}
TRIS is to set the electron flow direction of PORT
TRISD mean is to set the PORTD as input(1) or output(0) . Input mean 'read' from the PORTD , Output mean 'write' to PORTD. For this case, we set TRISD as 0 (output).
Next step is set which pin as output. If you refer to pin diagram, the PORTD have 8 pin ( RD0 to RD7). You can set any pin (from RD0 to RD7 ). For this case, we set RD1 as 1(output).
From here, you may confuse, why both value is same but why the result is different?
For TRISD and PORTD , you can see this :
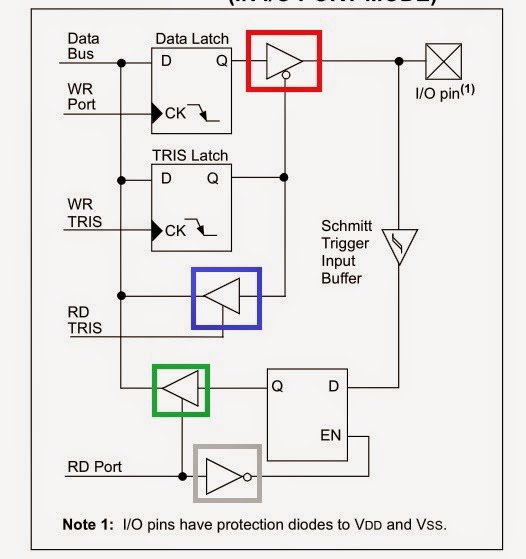
When you set TRISD as 0, the RD TRIS (the tristate logic) is off (the blue square) and the TRIS in read square is on . Next , you set PORT (RD1 = 1) as 1 , the TRIS in grey square is off, and the TRIS in green square is on. As long TRIS in red square is on, all the value from Data Bus is send to IO pin.
To have a easy look :
TRIS output
Red square: on
Blue square : off
Green square : on
Grey square off
From here , you are able to start program by using simple IO pin (actually O only )
So have a nice day
No comments:
Post a Comment